WebGPU game (#7): Movement and Terrain
In the previous post, we added an abstraction allowing us to compose entities in the game of reusable behaviours. However, that does not preclude adding components which have specialized behaviour. This post focuses on a handful of components which have such specialized behaviour.
Player controller
The first component is unimaginatively named the “player controller”. We need some way of controlling the player, of course!
To support this component, I’ve set up an Input resource, which simply
monitors keyboard events. This allows components to query whether a key is held
in the current frame or released in the previous frame.
// resources/input.ts
export class Input extends Resource {
  keysPressed: Set<string> = new Set();
  keysReleased: Set<string> = new Set();

  constructor() {
    super();
    this.keydownEvent = this.keydownEvent.bind(this);
    this.keyupEvent = this.keyupEvent.bind(this);
    window.addEventListener("keydown", this.keydownEvent);
    window.addEventListener("keyup", this.keyupEvent);
  }

  keyDown(key: string): boolean {
    return this.keysPressed.has(key);
  }

  keyReleased(key: string): boolean {
    return this.keysReleased.has(key);
  }

  postUpdate(_ctx: UpdateContext): void {
    this.keysReleased.clear();
  }

  destroy() {
    window.removeEventListener("keydown", this.keydownEvent);
    window.removeEventListener("keyup", this.keyupEvent);
  }

  private keydownEvent(e: KeyboardEvent) {
    this.keysPressed.add(e.key);
  }

  private keyupEvent(e: KeyboardEvent) {
      this.keysPressed.delete(e.key);
      this.keysReleased.add(e.key);
  }
}
Note the postUpdate above. This hook is used to ensure that resources are able
to do any necessary clean up after all other components have updated. I’ve
updated the Resource type to include this new lifecycle hook.
export abstract class Resource {
  ...
  /**
   * Performed after the `update` lifecycle method.
   */
  postUpdate(_ctx: UpdateContext) {}
}
Then, at the bottom of the World
class, we just call this method for all resources:
expot class World {
  ...
  update(ctx: UpdateContext) {
    ...

    for (const resource of this._resources.values()) {
      resource.postUpdate(ctx);
    }
  }
}
The last step for the input is to add this new resource to the world in our
main.ts file.
world
  .withResourceDefault(Input) // <-- new
  .withResource(gpuResources);
We now have enough resources and components to implement the player controller.
We grab the entity’s Transform component at initialization time to reduce the
overhead of running through the component hash map each frame. However, this is
mostly a matter of taste.
We then set up a 2-dimensional direction vector for the player movement. We want the camera to move either left, right, up or down, but the coordinate system is at a diagonal based on the camera’s orientation. We can quite simply resolve this by allowing the direction contributions to “cancel” out when multiple keys are pressed.
At the end of it all, we normalize this vector to ensure the player is always
travelling at the same speed and multiply the components by our desired speed
(in meters per second) and the number of seconds that have passed since the
previous frame (dt).
export class PlayerController extends Component {
  speed: number = 4;
  transform?: Transform;

  init(_: InitContext): void {
    this.transform = this.getComponent(Transform);
  }

  update(ctx: UpdateContext): void {
    const { dt, world } = ctx;
    const input = world.getResource(Input)!;
    let direction = Vec2.zero();
    if (input.keyDown("a")) {
      direction.x -= 1;
      direction.y += 1;
    } else if (input.keyDown("d")) {
      direction.x += 1;
      direction.y -= 1;
    }
    if (input.keyDown("w")) {
      direction.x -= 1;
      direction.y -= 1;
    } else if (input.keyDown("s")) {
      direction.x += 1;
      direction.y += 1;
    }

    if (direction.magnitudeSquared() > 0.1) {
      direction = direction.normal();

      this.transform!.position.x += this.speed * direction.x * dt;
      this.transform!.position.z += this.speed * direction.y * dt;
    }
  }
}
Add the new component to our player entity:
// entities/player.ts
export function newPlayer(world: World): Entity {
  ...
  return new Entity("player")
    ...
    .withComponentDefault(PlayerController);
}
Finally, we discover that our player can fly!
Camera follow
Okay, but now we want our camera to follow the player. My preference is that the camera shouldn’t snap to the player, but rather smoothly pan to somewhat center the player on the screen.
We can achieve this by moving the camera by some percentage of the difference between the player’s position and the camera’s position each frame. This is commonly known as a linear interpolation1, or lerp. Pictured below is the distance the camera would travel in one frame given the lerp percentage was 80% (or a ratio of 0.8). Notice how the top camera moves significantly further in that frame than the camera at the bottom. This will make it appear as if the camera is coming to a progressively gradual stop.
export function clamp(a: number, b: number, value: number) {
  return Math.max(a, Math.min(b, value));
}

export function lerp(a: number, b: number, ratio: number) {
  const t = clamp(0, 1, ratio);
  return a + t * (b - a);
}
We then create a Follow component which takes in the name of its target
entity, the offset on the - and -coordinates (implicitly, provided as
one value) and the strength of the linear interpolation.
export class Follow extends Component {
  readonly targetName: string;
  readonly offset: number;
  readonly lerpRatio: number;
  transform?: Transform;
  target?: Entity;

  constructor(targetName: string, offset: number, lerpRatio: number = 0.05) {
    super();
    this.targetName = targetName;
    this.offset = offset;
    this.lerpRatio = lerpRatio;
  }

  init(ctx: InitContext): void {
    const {world} = ctx;
    this.target = world.getByName(this.targetName);
    this.transform = this.getComponent(Transform);
    this.lerpToTarget(1);
  }

  update(_: UpdateContext): void {
    this.lerpToTarget(this.lerpRatio);
  }

  private lerpToTarget(t: number) {
    const transform = this.transform!;
    const target = this.target!;
    const targetPosition = target.getComponent(Transform)!.position;
    transform.position.x = this.offset +
      lerp(transform.position.x - this.offset, targetPosition.x, t);
    transform.position.z = this.offset +
      lerp(transform.position.z - this.offset, targetPosition.z, t);
  }
}
Hopefully, the above is clear. It’s really just a lot of glue for our EC! The
bulk of it is that we want to jump to the target on init, but then smoothly
pan on further updates.
You can now joyfully walk the player out into the void.
Terrain
This section has quite a lot of moving parts, so I’ll provide a high-level overview.
- I want a terrain made up of the cube2 we’ve been working with for most of these posts.
- I want the terrain to have a limited size to reduce the complexity for this blog series.
- I want the terrain not to render unseen faces, possibly having a performance impact.
With that, let’s get started!
Firstly, we need to make some minor amendments to the Mesh component. I want
to get at the vertices and update them. There are a handful of ways to achieve
this, I’m just going for the fastest!
First add the following property to the Mesh and set it to false in the
constructor.
/**
 * A per-frame check to see if the vertices list was updated in the previous
 * frame.
 */
private _shouldUpdate: boolean;
Create a new setter for the _vertices property:
set vertices(value: Vertex[]) {
  this._shouldUpdate = true;
  this._vertices = value;
}
Inside of the update method, check whether the flag is set:
update(ctx: UpdateContext): void {
  const {world} = ctx;
  const device = world.getResource(GpuResources)!.device;

  if (this._shouldUpdate) {
    this.createVertexAndIndexBuffers(device);
  }
  ...
}
And, unlike me, don’t forget to set the flag to false inside of the
createVertexAndIndexBuffers method (or in the if block above)!
Finally, we need to implement the Terrain component. I’m going to add in-line comments to the source (which you can omit) to explain my thinking for each step.
// components/terrain.ts

// I like data types that describe my domain exactly. Integers are too big a
// domain for the purpose of identifying the different blocks in the game.
export enum Block {
  Air = 0,
  Grass = 1,
  Dirt = 2,
}

// The index of the top-face of the given block in the texture atlas.
function topIndex(block: Block) {
  switch (block) {
    case Block.Dirt:
      return 0;
    case Block.Grass:
      return 2;
    case Block.Stone:
      return 4;
    case Block.Air:
      throw new Error("Should never call with air");
  }
}

// The index of the side-face of the given block in the texture atlas.
function sideIndex(block: Block) {
  switch (block) {
    case Block.Dirt:
      return 1;
    case Block.Grass:
      return 3;
    case Block.Stone:
      return 5;
    case Block.Air:
      throw new Error("Should never call with air");
  }
}

export class Terrain extends Component {
  private _blocks: Block[];
  private _mesh?: Mesh;
  private _texture?: GPUTexture;

  // Some constants for the maximum dimensions of the terrain
  static SIZE_X = 80;
  static SIZE_Y = 8;
  static SIZE_Z = 80;

  constructor() {
    super();
    const volume = Terrain.SIZE_X * Terrain.SIZE_Y * Terrain.SIZE_Z;
    // Create the array representing the blocks
    this._blocks = Array.from({length: volume}).map((_, index) => {
      const c = Terrain.coordinates(index);
      // Make the lowest layer have something regardless of the next step to
      // avoid air gaps!
      if (c.y == 0) {
        return Block.Dirt;
      }
      // Some arbitrary trigonometric functions to create some variance in the
      // terrain.
      if (c.y > 1 + (Math.cos(c.z * 0.2 - 0.3 + c.x * 0.15) + Math.sin(c.z * 0.25 + 0.5))) {
        return Block.Air;
      }
      return Block.Dirt;
    });

    this._blocks = this._blocks.map((block, index) => {
      const c = Terrain.coordinates(index);
      if (block == Block.Air) {
        // Decorate the world with some stone features
        if (Math.random() < 0.025 && this.hasNeighbor(c, new Vec3(0, -1, 0))) {
          return Block.Stone;
        }
        return block;
      }
      // Convert all air-exposed dirt blocks into grass blocks. Note the renamed
      // Vec3#unitY method.
      if (!this.hasNeighbor(c, Vec3.unitY())) {
        return Block.Grass
      }
      return block;
    });
  }

  init(ctx: InitContext): void {
    const {world} = ctx;
    this._mesh = this.getComponent(Mesh)!;
    this._texture = world.getResource(GpuResources)!.texture;
    this._mesh.vertices = this.generateVertices(this._texture);
  }

  private generatevertices(texture: gputexture): vertex[] {
    const volume = terrain.size_x * terrain.size_y * terrain.size_z;
    // for each block, either provide the cube from the function exported from
    // the terrain entity's file.
    return array.from({length: volume}).map((_, index) => {
      const block = this._blocks[index];
      if (block == Block.air) {
        return [];
      }
      const c = Terrain.coordinates(index);
      return cube(texture, topIndex(block), sideIndex(block)).map(a => {
          a.position.x += c.x;
          a.position.y += c.y;
          a.position.z += c.z;
          return a;
      });
    }).flat();
  }

  setBlock(coord: Vec3, block: Block) {
    const index = Terrain.index(coord.x, coord.y, coord.z);
    if (index !== undefined) {
      if (this._blocks[index] !== block) {
        this._blocks[index] = block;
      }
    }
  }

  getBlock(coord: Vec3): Block | undefined {
    const index = Terrain.index(coord.x, coord.y, coord.z);
    if (index !== undefined) {
      return this._blocks[index];
    }
  }

  // I honestly have to sit with a pen and paper whenever I work this out. I
  // basically choose some arbitrary order (as per the index function below) and
  // work backwards to figure out these equations.
  static coordinates(index: number): Vec3 {
    return new Vec3(
      index % Terrain.SIZE_X,
      Math.floor(index / Terrain.SIZE_X) % Terrain.SIZE_Y,
      Math.floor(Math.floor(index / Terrain.SIZE_X) / Terrain.SIZE_Y),
    );
  }

  static index(x: number, y: number, z: number): number | undefined {
    // make sure the coordinates are in bounds, first.
    if (x < 0 ||
        y < 0 ||
        z < 0 ||
        x >= Terrain.SIZE_X ||
        y >= Terrain.SIZE_Y ||
        z >= Terrain.SIZE_Z) {
      return undefined;
    }
    return x + (Terrain.SIZE_X * (y + Terrain.SIZE_Y * z));
  }
}
Optimization
On some devices, you may notice the game running extremely slowly. We could lower the dimensions of the terrain, or apply some frustum culling3 and only render “chunks” of terrain at a time within our view frustum. I’m trying to get to minimal viable game, so we’re going to apply one relatively simple optimization: face culling.
The idea here is to remove faces that are never seen by the camera. In our game there are two kinds of faces that are never seen by the camera: faces that face away from the camera and faces that border another solid block.
We resolve this by first creating a new simplified method for obtaining the faces for our cubes based on the cardinal direction:
// components/terrain.ts
const cardinalDirections = [
  new Vec3(1, 0, 0),
  new Vec3(0, 1, 0),
  new Vec3(0, 0, 1),
  new Vec3(-1, 0, 0),
  new Vec3(0, -1, 0),
  new Vec3(0, 0, -1),
];

function cubePlane(
  texture: GPUTexture,
  topIndex: number,
  sideIndex: number,
  direction: Vec3,
) {
  if (direction.x == 1) {
    return [
      new Vertex(new Vec3(1, 0, 1), uvFromIndex(sideIndex, 0.0, 1.0, texture)),
      new Vertex(new Vec3(1, 0, 0), uvFromIndex(sideIndex, 1.0, 1.0, texture)),
      new Vertex(new Vec3(1, 1, 0), uvFromIndex(sideIndex, 1.0, 0.0, texture)),
      new Vertex(new Vec3(1, 1, 1), uvFromIndex(sideIndex, 0.0, 0.0, texture)),
    ];
  // skipping x == -1 (we can't see it)
  } else if (direction.z == 1) {
    return [
      new Vertex(new Vec3(0, 0, 1), uvFromIndex(sideIndex, 0.0, 1.0, texture)),
      new Vertex(new Vec3(1, 0, 1), uvFromIndex(sideIndex, 1.0, 1.0, texture)),
      new Vertex(new Vec3(1, 1, 1), uvFromIndex(sideIndex, 1.0, 0.0, texture)),
      new Vertex(new Vec3(0, 1, 1), uvFromIndex(sideIndex, 0.0, 0.0, texture)),
    ];
  // skipping z == -1 (we can't see it)
  } else if (direction.y == 1) {
    return [
      new Vertex(new Vec3(0, 1, 1), uvFromIndex(topIndex, 0.0, 1.0, texture)),
      new Vertex(new Vec3(1, 1, 1), uvFromIndex(topIndex, 1.0, 1.0, texture)),
      new Vertex(new Vec3(1, 1, 0), uvFromIndex(topIndex, 1.0, 0.0, texture)),
      new Vertex(new Vec3(0, 1, 0), uvFromIndex(topIndex, 0.0, 0.0, texture)),
    ];
  }
  // skipping y == -1 (we can't see it)
  return [];
}
Then, we replace the cube function in our Terrain component under its
generateVertices method with a check for each face:
export class Terrain extends Component {
  ...
  private generateVertices(texture: GPUTexture): Vertex[] {
      ...
      // new
      return cardinalDirections.map(d => {
        return cubePlane(texture, topIndex(block), sideIndex(block), d).map(a => {
            a.position.x += c.x;
            a.position.y += c.y;
            a.position.z += c.z;
            return a;
        });
      }).flat();
    }).flat();
  }
}
This allows us to reduce the number of faces in the scene by half! We can do even better with a very simple check for adjacent blocks.
export class Terrain extends Component {
  ...
  /**
   * Helper to determine if connected to another solid block.
   */
  hasNeighbor(coord: Vec3, offset: Vec3): boolean {
    const block = this.getBlock(coord.add(offset));
    if (block !== undefined && block !== Block.Air) {
      return true;
    }
    return false;
  }

  private generateVertices(texture: GPUTexture): Vertex[] {
    const volume = terrain.size_x * terrain.size_y * terrain.size_z;
    return Array.from({length: volume}).map((_, index) => {
      ...
      return cardinalDirections.map(d => {
        // new
        if (this.hasNeighbor(c, d)) {
          return [];
        }
        ...
      }).flat();
    }).flat();
  }
}
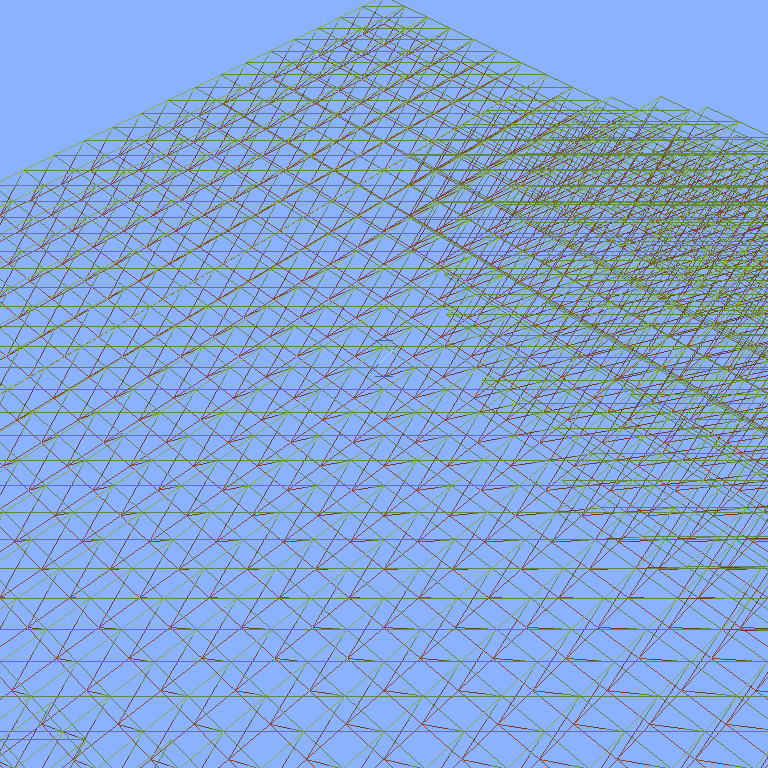
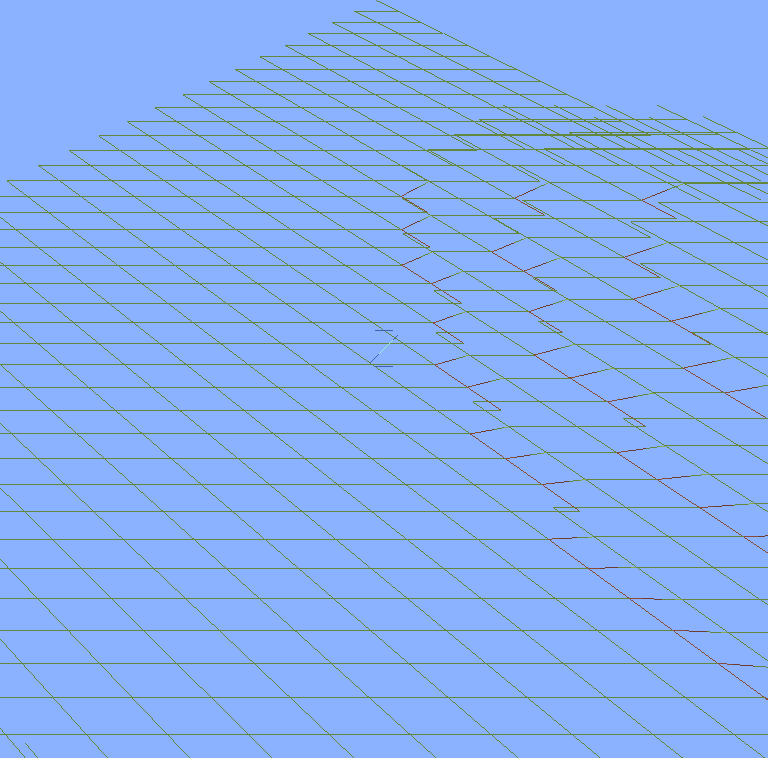
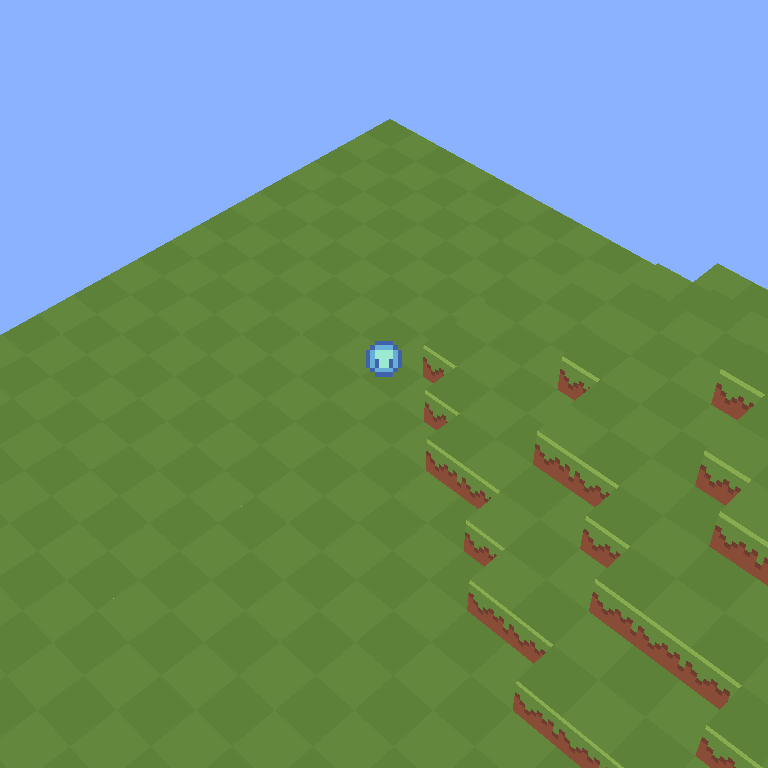
You can compare the faces that are rendered by only rendering lines4 instead of triangles.
Before face culling
After face culling
Perception
The last thing is a matter of taste, but the following image is what we currently have. If we ignore the hill on the side, it would be really difficult to get an idea of how fast the player is moving on a flat surface. Additionally, it is really hard to perceive a change in depth (such as at the back of the hill).
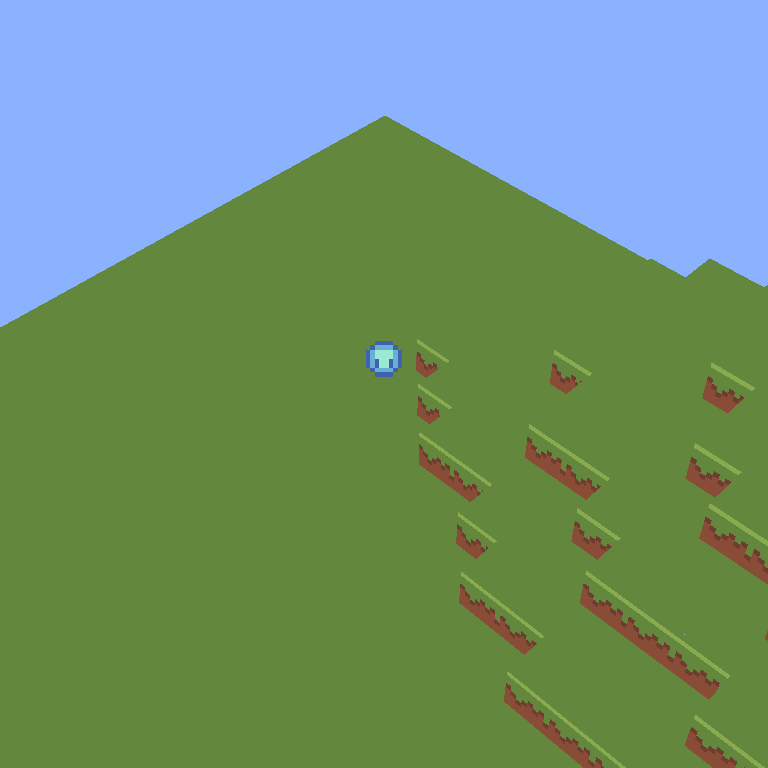
I’ve opted to tint each other tile to distinguish them. Another option is to make the textures more detailed and add shadows, but that’s beyond the scope of this project and I want to keep the game as performant as possible, considering it’s running in the browser!
For this change, I’ll link out to the diff, as the changes are tiny but scattered across multiple lines and files. The basic idea is that we need to add a new attribute to our vertex type, inform the pipeline of this change, and update our shader to use this new color/tint attribute. We end up with the following:
This post is quite long, so I’m going to leave it there! Next time, we’ll take a look at setting up some rudimentary collision detection. The player should be able to interact with the terrain and the upcoming enemies and their projectiles.
As a challenge, consider making the terrain more complex. You can stack noise functions5 to improve the variance in the terrain and spawn interesting features. I might circle back to this in another standalone post, but I’ll skip it for this series.
Links
Footnotes
-
Cube-ish, remember it has no bottom face! ↩
-
https://en.wikipedia.org/wiki/Hidden-surface_determination#Viewing-frustum_culling ↩
-
You can get this same output by changing the render pipeline’s primitive topology from “triangle-list” to “line-list” temporarily. ↩