What is HTTP, really?
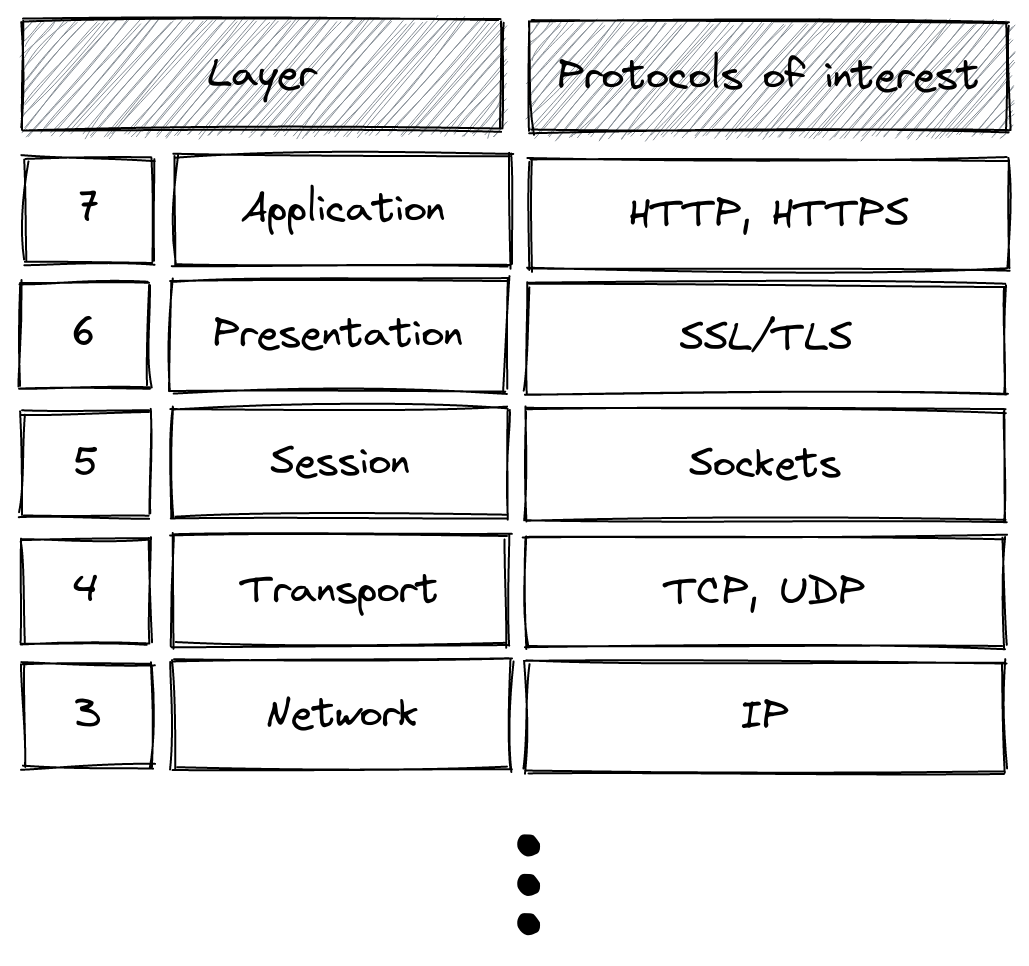
I recently stumbled across a problem, which led me to realize that I’m not entirely familiar with how HTTP practically works. I had a vague hand-wavy idea that it is a text-based communication protocol built on top of TCP. However, that was about the extent of it. I recall learning to parrot the 7-layer OSI model and never returning to it after university.
There is a lot of up-front theory, but this ends on a hands-on approach to understanding how your computer is able to understand the HTTP protocol and to solidify any uncertainties you may have with the theory.
OSI Model
The Open Systems Interconnection model (OSI model) is a standard for communication in computing. This post is mostly concerned with protocols from layer 3 (Network) through to layer 7 (Application). I am not an engineer, after all. I highly recommend reading through external material about the OSI model if you are interested in more detail.
IP
The Internet Protocol (IP) is responsible for routing data from a source host to a destination host. All metadata relating to routing information is stored in the header and the data is stored in the payload of an IP “packet”.
Both hosts, such as general purpose computers, as well as routers are responsible for routing IP packets based on the routing information in the header of each packet. Domain name system (DNS) servers are included in this network of routing. For the purposes of this post, I am going to skip over how DNS works, but you can trust that it usually does.
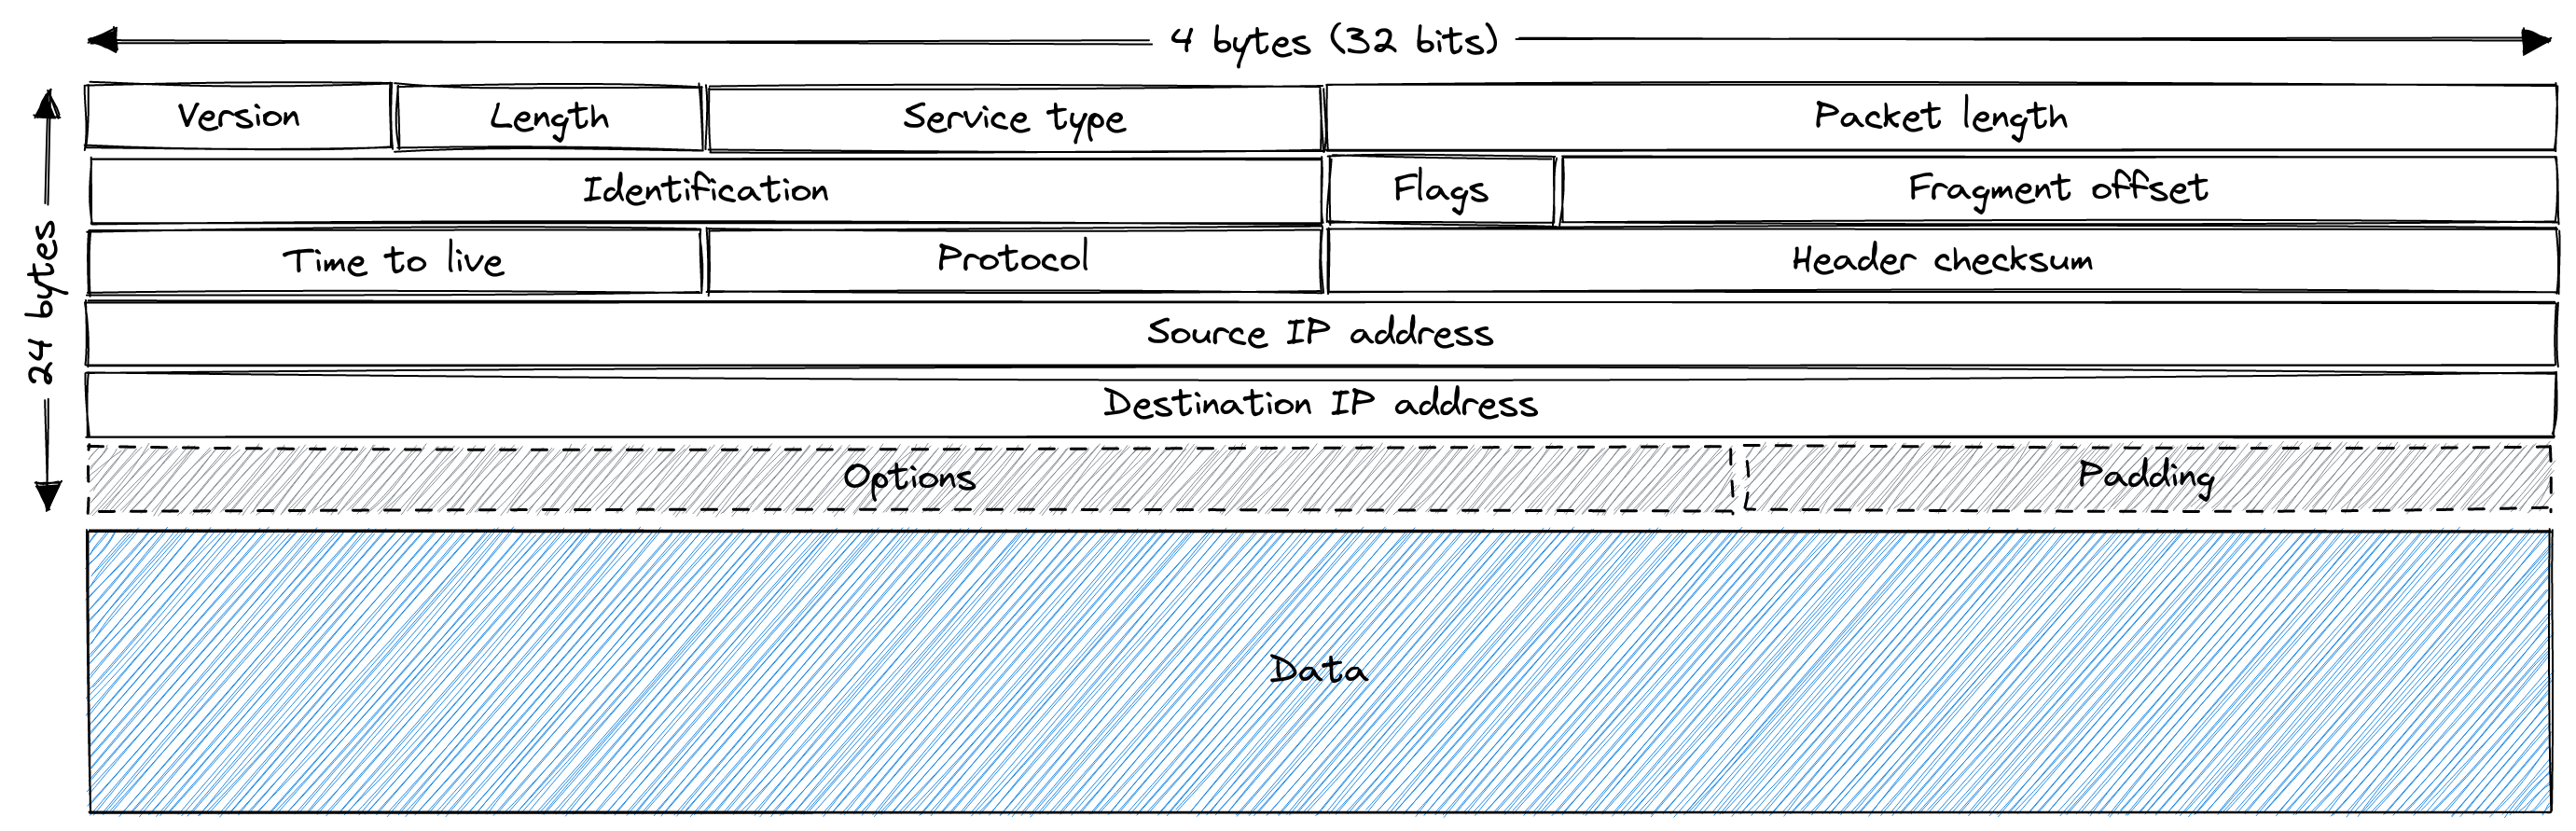
IP packet format
The following shows the IP packet format with 4 bytes (32 bits) per row. For a
total of 20 or 24 bytes for the headers. The Data field can have variable
length. The Option field can have variable length within its row. Overall, the
maximum size of an IP packet is 65,535 bytes.
Problems with IP
IP does not resolve an array of issues which are encountered by networks. For a non-exhaustive list of issues with packets:
- Packets can arrive out of order.
- Packets can be lost for a number of physical and networking reasons.
- Packets can be corrupted.
- Packets can be accidentally duplicated through retransmission of the same packet.
TCP/UDP
The User Datagram Protocol (UDP) and the Transmission Control Protocol (TCP) are two protocols which are performed over IP.
A quick summary of UDP is that it does not handle lost packets. This can be a desirable property in which speed is more important than reliability.
For this section, we’ll focus on TCP, as HTTP is layered over TCP. TCP aims to resolve all of the issues mentioned in the previous section.
TCP is managed by your operating system, so you are highly unlikely going to implement or work with TCP at the protocol level unless you are working on operating systems or embedded systems.
TCP packet format
The TCP-specific header and data fields are contained entirely within the data field of an IP packet. The options field can vary such that a TCP header can range from 20 to 60 bytes in size.

Transmission process
A TCP connection needs to be established before any data can be transmitted between machines. Your operating system typically manages the lifecycle of a TCP connection, and your programming language of choice should have a standard library that implements a standard interface across most common operating systems.
Each side of the connection maintains a sequence number to ensure that packets are received in order. If the expected sequence number is mismatched with what is received, then the host can broadcast back to the sender that it is missing a packet. Every TCP packet includes and increments this sequence number. You will see a demonstration of this, later, in the Hands-on section.
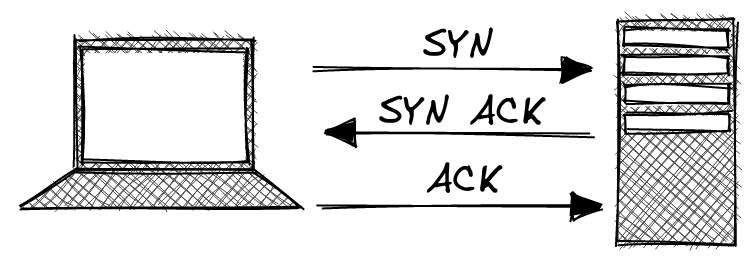
Step 1: Establish connection
To establish a TCP connection, a three-way TCP handshake needs to occur. In the following example, the client sends a packet with the SYN (Synchronize) flag set. The server then responds with a SYN ACK (Acknowledged). Finally, the client responds with an ACK.
Step 2: Send data
Data can be sent back-and-forth as long as the connection is still alive. Recipients of a TCP packet must always acknowledge what they receive to ensure that packets are retransmitted when they fail to arrive.
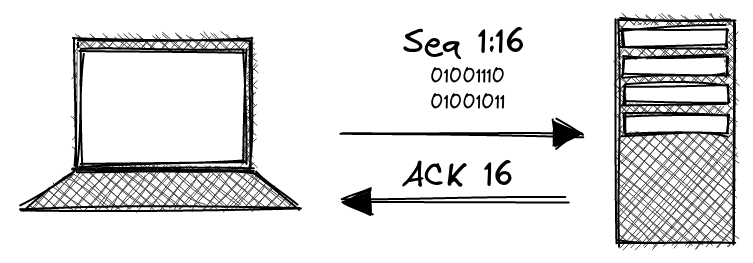
As mentioned previously, the server in this example responds with an ACK and the
number that represents the latest acknowledged sequence number. Following this
example, the client would send some data of size n with seq 16:(n+16) and
the server would respond with ack (n+16). A failure to ACK or an incorrect ACK
would result in the client retransmitting the data.
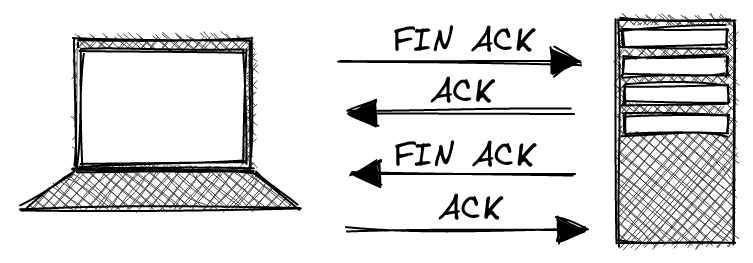
Step 3: Close connection
Either party can close the TCP connection. Closing a TCP connection is performed as a four-way handshake.
SSL/TLS and HTTPS
Covering the details of SSL/TLS and HTTPS is beyond the scope of this post. There are plenty of resources on the internet if you are interested in reading about it right now.
In a very brief summary, SSL/TLS is responsible for ensuring a two-way encrypted communication channel that is established over plain-text but is not susceptible to man-in-the-middle, replay and other attacks which could result in a private communication channel being compromised. Only the server and the client should be able to read each other’s messages.
HTTP
As alluded to in the beginning, HTTP is a text-based protocol which makes the definition dead-simple. The four steps of an HTTP request/response is as follows:
- Client starts TCP connection with server.
- Client sends HTTP request.
- Server sends HTTP response.
- Server closes TCP connection with client.
The format of an HTTP request is:
[VERB] [PATH] HTTP/1.1
[HEADER]: [HEADER_VALUE]
\n
[OPTIONAL_BODY]
For example:
POST /task/create HTTP/1.1
user-agent: curl
content-encoding: application/json
content-length: 25

{text:"Clean the dishes"}
The format of an HTTP response is:
HTTP/1.1 [STATUS_CODE] [STATUS_MESSAGE]
[HEADER]: [HEADER_VALUE]
\n
[OPTIONAL_BODY]
For example:
HTTP/1.1 200 OK
content-length: 127
content-type: text/html
Hands-on
The following demonstrates how you can use tcpdump and nc (netcat) to
observe and send TCP data across your local loopback interface. This is the
interface over which any communication through localhost (127.0.0.1) is
performed. We will do this to impersonate an HTTP client talking to a local
server. I am going to use the builtin Python http.server module to run a
trivial HTTP server. You are free to use alternatives.
For starters, start running your HTTP server in a separate terminal/tab:
python3 -m http.serverYou should see the following output:
Serving HTTP on 0.0.0.0 port 8000 (http://0.0.0.0:8000/)TIP:
0.0.0.0is visible on every network interface, while127.0.0.1is local to your computer. This is an important distinction in case you have ports forwarded on your router. This server, for example, would be visible to the internet if I had port8000forwarded.
Now run the following to determine your loopback interface.
sudo tcpdump -D | grep "Loopback"In my case, I had the following output:
3.lo [Up, Running, Loopback]So, to follow the TCP packets being sent over my loopback interface, I can run the following snippet. Yours may differ, so make sure to check.
sudo tcpdump -i loNow, in a third terminal you will want to run netcat on your localhost on port 8000:
nc localhost 8000Then enter the following:
GET / HTTP/1.1
# Hit enter twice
You’ll notice that you get an HTML response in that terminal, and the Python
server shows that it received a valid HTTP request and responded with a success
(200 status code). Netcat should either close, or if it doesn’t and you try
entering anything, it should exit with Ncat: Broken pipe..
There are a few things to take away just from that. Firstly, netcat establishes a TCP connection with the HTTP server. Once the request is sent and the response is received, the TCP connection is closed and you can no longer send another request on the same connection (Spoiler: HTTP/2 does not have this constraint).
However, if we peak over to the tcpdump output, we can see how TCP and HTTP
related during that exchange. I am going to modify the output a bit with
friendly names and trim off any extra information. Your output will look
different.
The first three lines clearly show the three-way handshake to establish a TCP connection between the client and server.
IP CLIENT > SERVER: Flags [S], seq 189676203, win 65495, length 0
IP SERVER > CLIENT: Flags [S.], seq 3922799456, ack 189676204, win 65483, length 0
IP CLIENT > SERVER: Flags [.], ack 1, win 512, length 0
Now, after we sent through the GET / HTTP/1.1 request we saw:
IP CLIENT > SERVER: Flags [P.], seq 1:16, ack 1, win 512, length 15
IP SERVER > CLIENT: Flags [.], ack 16, win 512, length 0
IP CLIENT > SERVER: Flags [P.], seq 16:17, ack 1, win 512, length 1
IP SERVER > CLIENT: Flags [.], ack 17, win 512, length 0
You’ll notice the request has 15 characters (go on, count them!). Then there’s the new line character. This signifies the end of our GET request, since a GET request has no body. Immediately after this, the server sends its response:
IP SERVER > CLIENT: Flags [P.], seq 1:157, ack 17, win 512, length 156
IP CLIENT > SERVER: Flags [.], ack 157, win 511, length 0
IP SERVER > CLIENT: Flags [P.], seq 157:3611, ack 17, win 512, length 3454
IP CLIENT > SERVER: Flags [.], ack 3611, win 494, length 0
Now, your response here may differ but this shows the response being broken up
into two TCP packets of differing lengths. In my case the first part contained
the response headers and the second part contained the body. In reality these
could be split up on even more arbitrary bounds. To see the content of a TCP
packet in tcpdump, you can add the -A flag to the command. For the purposes
of keeping the output less noisy, I’ve opted to drop the actual packet payload
for this blog post.
Moving on, we finally see the four-way handshake to terminate the TCP connection:
IP SERVER > CLIENT: Flags [F.], seq 3611, ack 17, win 512, length 0
IP CLIENT > SERVER: Flags [.], ack 3612, win 512, length 0
IP CLIENT > SERVER: Flags [F.], seq 17, ack 3612, win 512, length 0
IP SERVER > CLIENT: Flags [.], ack 18, win 512, length
And that’s it! You can now confidently wave your hands slightly less when someone asks you to describe HTTP. Given that they don’t ask you any details about the dreaded physical and data link layers. Joking aside, please dive deeper into this if you are uncertain of anything. The best way to gain a deep understanding of things is to tinker with them yourself.